Key Facts About Your StudentAid.gov Account

Your StudentAid.gov account—and the username and password you use to log in—are essential to a successful and secure financial aid experience.
Keep reading or select a link to learn key facts about StudentAid.gov accounts:
- What is a StudentAid.gov account?
- Who needs a StudentAid.gov account?
- How do I create a StudentAid.gov account?
- Can I update my StudentAid.gov account?
- Do I need a StudentAid.gov account to complete the FAFSA® form?
- Will I need to use my StudentAid.gov account after leaving school?
- How do I troubleshoot StudentAid.gov account issues?
1
What is a StudentAid.gov account?
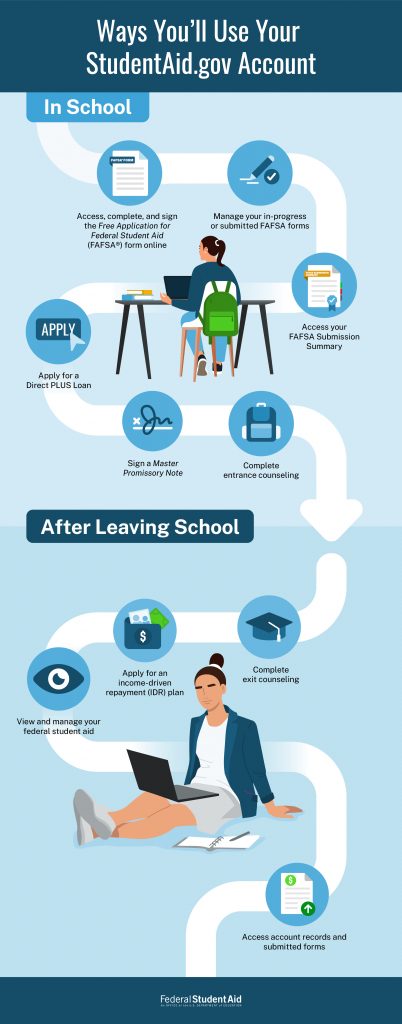
A StudentAid.gov account allows you to access resources and forms on StudentAid.gov. When you apply for financial aid, you’ll create an account that you’ll use throughout the federal student aid process. This includes
- completing and submitting the Free Application for Federal Student Aid (FAFSA®) form;
- checking the status of your FAFSA form;
- reviewing your Federal Pell Grant and student loan amounts and limits;
- accessing your account records, including your Master Promissory Note (MPN);
- tracking your student loan payments;
- accessing repayment tools and forms; and
- signing forms electronically.
Your account grants you access to StudentAid.gov and acts as a legal signature for documents. When you create an account, you’ll enter your personal information, and your identity will be verified. This means each account can be associated with only one person. This also means you can have only one StudentAid.gov account, and you can’t create a new account if you lose access to yours. (Instead, you can recover your account.) Don’t share your account with anyone, including your parent(s) or spouse.
2
Who needs a StudentAid.gov account?
You’ll need your own StudentAid.gov account to complete the FAFSA form online. If you have any additional FAFSA contributors, they’ll each need their own StudentAid.gov account as well.
A contributor is anyone who is required to provide their information on the FAFSA form, sign the FAFSA form, and provide their consent and approval for the transfer of federal tax information directly from the Internal Revenue Service (IRS) into the form. Contributors include you (the student) but can also include your parent(s), your stepparent, or your spouse (if you’re married).
Each FAFSA® form contributor is required to have their own StudentAid.gov account to complete and sign their sections of the form.
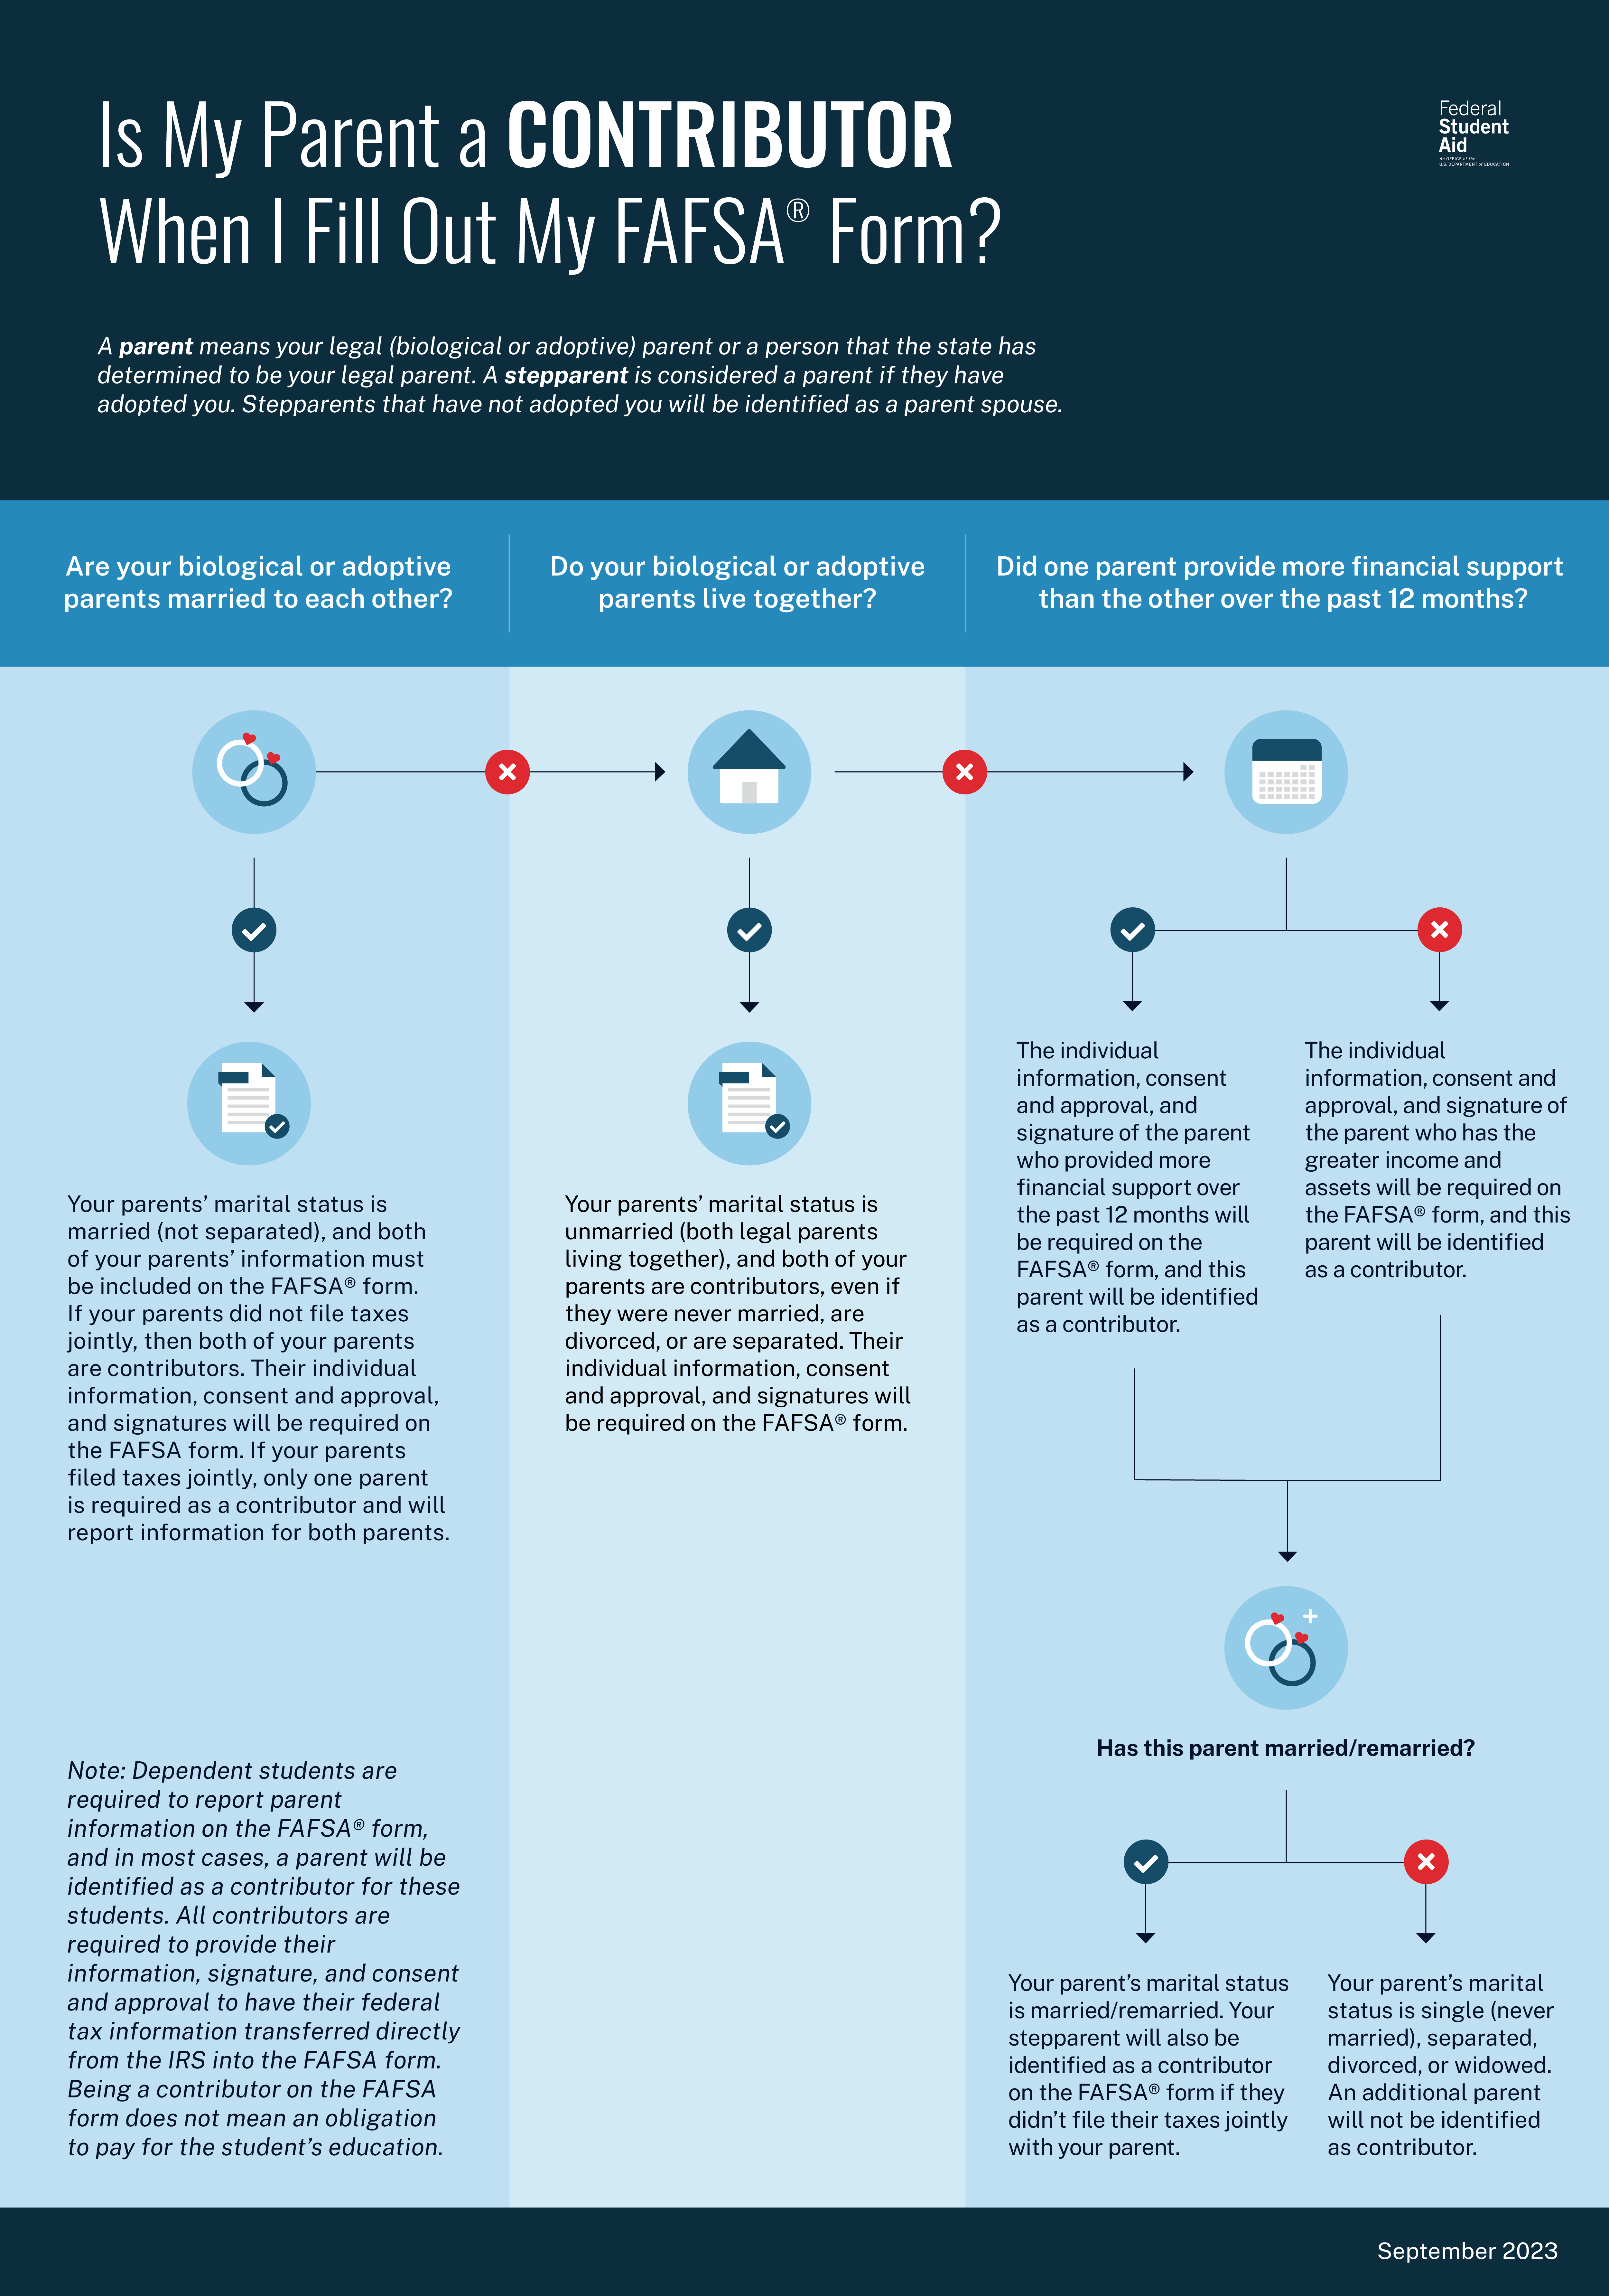
There are resources available to help determine who is likely to be identified as a contributor on your FAFSA form and will need a StudentAid.gov account. If you’re wondering whether you’ll need to invite any contributors to your form, use the image below to determine who will need a StudentAid.gov account to contribute to your FAFSA form.
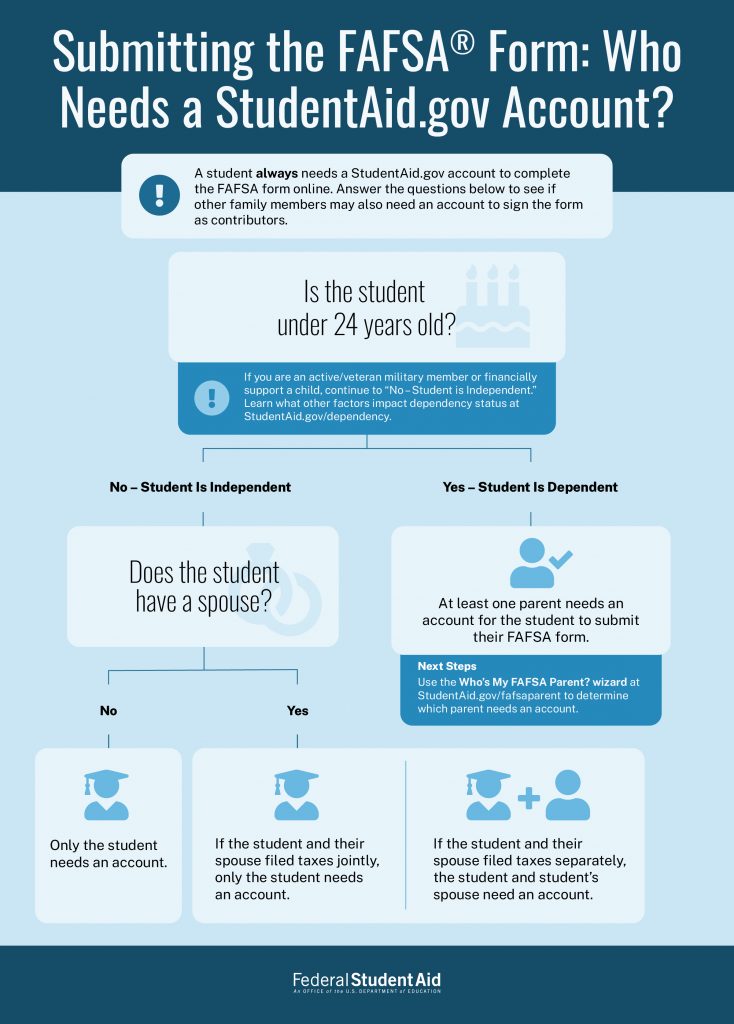
If you’re a dependent student, you and your parent(s) can use the Who’s My FAFSA Parent? wizard to see which parent or parents will need to create a StudentAid.gov account. The tool takes most people less than five minutes to use. Through a series of questions, it will help you determine which parent(s) will be required to contribute to your FAFSA form. You also can refer to the “Is My Parent a Contributor When I Fill Out My FAFSA® Form?” infographic.
All contributors to your FAFSA form (including you) will need to create a StudentAid.gov account before starting the form. When you create your account, your information will be verified by the Social Security Administration (SSA) or through other identity verification processes. Verification with SSA usually happens right away, but if the system is unavailable at the time you create your account, your SSA verification status will show as “Pending.” Pending status can take one to three days to resolve; however, you’ll be able to submit a FAFSA form and have limited access to other applications until your information is verified with SSA.
After Leaving School and Entering Repayment
If you accept any federal student loans, you’ll use your StudentAid.gov account to manage them when you leave school and begin repayment.
Remember, you can have only one StudentAid.gov account. You’ll use the same account and log-in credentials through all stages of receiving and managing your federal student aid. You will not create a new account after you leave school and enter repayment. This is true for everyone who creates a StudentAid.gov account, including your parent if they take out a parent PLUS loan to help with your education costs.
3
How do I create a StudentAid.gov account?
If you have a Social Security number (SSN) or were assigned an SSN or pseudo-SSN as an eligible noncitizen), visit StudentAid.gov/create-account and follow the steps below to create your account.
- Enter your personal information, including your full legal name, date of birth, and SSN.
To be eligible for federal student aid, you (the student) must have an SSN unless you are a citizen of the Freely Associated States (Federated States of Micronesia, Republic of the Marshall Islands, and Republic of Palau). When entering your name, make sure you enter it exactly as it appears on your Social Security card. Don’t use a nickname. If you don’t have a middle name, leave the middle name field blank. If your name is too long to fit into the provided fields, enter as many characters as you can. Accepted characters include letters, numbers, spaces, periods (.), apostrophes (‘), and hyphens (-). If your name has changed and no longer matches your Social Security card, you must update it with SSA. - Add your email address.
An email address can be associated with only one StudentAid.gov account. You’ll use your StudentAid.gov account for all stages of the federal student aid process, so you should choose an email address you’ll continue to have access to in the future. We recommend that you don’t use a school or work email address, which you might lose access to at a later date. To verify your email address, you’ll enter the secure code that you receive via email. - Add your mobile phone number.
When entering your phone number, keep in mind that a phone number can be used for only one StudentAid.gov account―it can’t be shared with or used for any other accounts. To verify your phone number, you’ll enter the secure code that you receive via text message. Note: Adding your mobile phone number is optional, but we recommend it since you can use your number to access your account if you forget your log-in credentials. - Enter your mailing address and select your communication preferences.
If you’re homeless or don’t have a permanent address, you don’t need to provide a home address, but you must provide an address where you reliably receive mail. You may use the address of a relative or friend who has given you permission to use it or the address for your college, career school, or trade school. If you want to use your school’s address, you must first contact the school for permission. You’ll also set your communication preferences by selecting if you prefer to receive communications via email or postal mail. - Create your username and password.
You can use the first part of your email address as your username. However, don’t use personal identifiers, such as your first or last name, date of birth, or SSN, in your password. - Review your two-step verification methods.
To protect your account from unauthorized access, you’ll be asked to provide a one-time code each time you log in. Under “Additional Verification Methods,” you’ll have the option to set up more verification methods, including text messages (if you haven’t done so already) and an authenticator app or security key to generate secure codes. Your unique backup code also will appear in this section, so you can copy and save the code to use to log in if you can’t use your other verification methods. - Start using your account.
As soon as you create your StudentAid.gov account, you’ll immediately be able to complete your sections of the FAFSA form, as well as sign it. You’ll also be able to view your account Dashboard, where you can check the status of your FAFSA form. Note: If your identity was verified immediately with SSA, your account will have full functionality. If your verification doesn’t happen immediately, you’ll receive a confirmation email once your account has been verified. If your information can’t be verified, we’ll provide instructions for how you can update your information in your account settings.
Keep the account username and password you create secure. Don’t share the information with anyone else, including your family members.
What if I don’t have a Social Security number?
Contributors who don’t have an SSN can still create a StudentAid.gov account to fill out and sign their required sections of the online FAFSA form. If you’re a student without an SSN, you should create an account only if you’re a citizen of the Freely Associated States.
To create your account, visit StudentAid.gov/create-account and follow the steps below:
- Enter your personal information, including your full legal name and date of birth. Under the text box that asks you to enter your SSN, select “What if I don’t have a Social Security number?” You can then check the “I don’t have a Social Security number” box before selecting “Continue.”
- Follow steps 2 through 6 listed above for users with an SSN.
- As a final step, you will be asked to verify your identity. You’ll first confirm and certify your identity. Then you may see up to four identify verification questions, and you must answer all of the questions to continue. Not everyone will see these questions—if you don’t receive questions, your account can still be verified without them.
- After you submit your answers (if required), you’ll see a confirmation page with the results of your identity verification. If your identity is verified, you can immediately begin fully using your account. If your identity can’t be verified, you’ll still immediately be able to access your account, but it will have limited functionality. No additional steps are needed. If you’re creating an account to contribute to or submit a FAFSA form, you’ll immediately be able to access the form to complete your sections and sign the form. You’ll also be able to view your account Dashboard.
4
Can I update my StudentAid.gov account?
After creating your account, you will be able to update your
- username and password;
- personal information (your name and date of birth);
- contact information (your email, phone number, and address);
- communication preferences; and
- two-step verification methods.
To access your StudentAid.gov account settings, follow these steps:
Log in to your account at StudentAid.gov.
Select your first name on the navigation bar at the top of the page and then select “Settings” from the drop-down menu.
Select the section on the left-hand side that you want to update and then select “Edit.”
5
Do I need a StudentAid.gov account to complete the FAFSA® form?
To fill out and submit your FAFSA form online, you’ll need a StudentAid.gov account. When you log in to your account, you’ll be taken to your account Dashboard. If you haven’t started your FAFSA form yet, you can do so from your Dashboard or visit fafsa.gov to begin.
Once you start the FAFSA form, your form will appear under the “My Activity” section of your Dashboard.
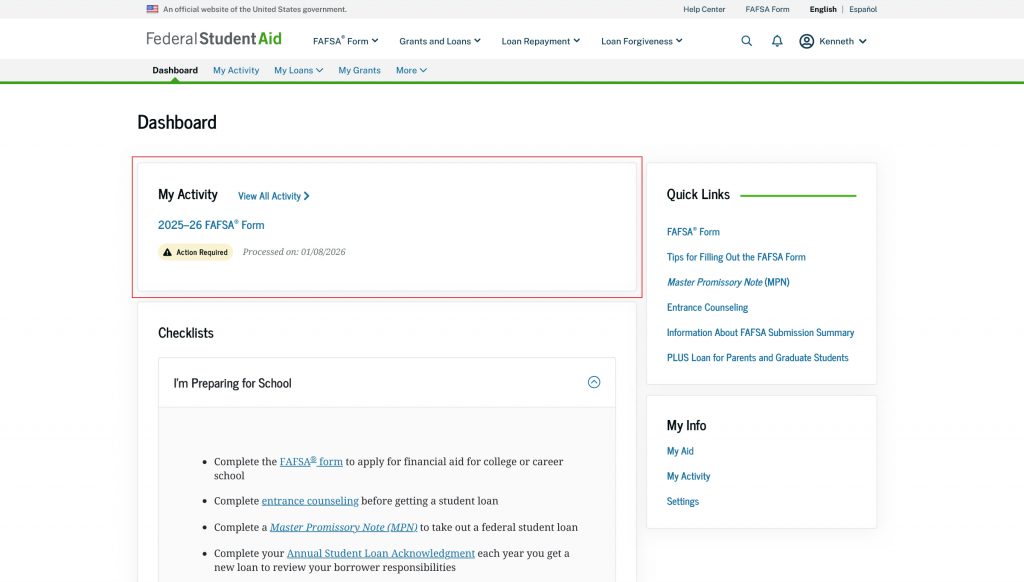
To view details about your FAFSA form, select the form in the “My Activity” section of your Dashboard. This will take you to the “My Activity” page, where you will see a FAFSA status tracker; a list of your invited contributors and the status of their invite(s) and sections; and a list of the colleges, career schools, and trade schools that you included on your form.
After your FAFSA form is submitted and processed, you can select your form to see your FAFSA submission history, your FAFSA Submission Summary, and any next steps you’ll need to take for your FAFSA form, including alerts about any errors that you need to fix. To learn more, read our “7 Things To Do After Submitting Your FAFSA® Form” article.
6
Will I need to use my StudentAid.gov account after leaving school?
After you leave school and enter repayment—if you accepted any federal student loans—you’ll use your StudentAid.gov account to manage your federal student aid and track your payments (including your payment due date and amount).
When you log in to your StudentAid.gov account, you’ll be taken to your account Dashboard. Once you start repaying your federal student loan(s), you can view details about your loan(s) on your Dashboard.
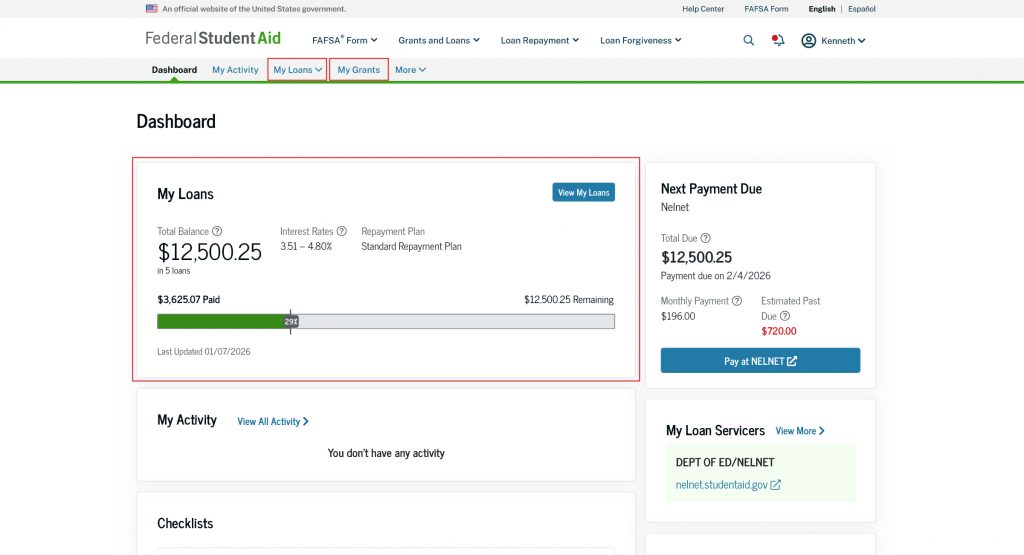
Loans
Under the “My Loans” section, you can see the total balance of all the federal student loan(s) you’ve received as well as information about your interest rate, recertification date (if applicable), and the amount remaining for repayment. This section also lists your repayment plan—you can check which plan you’re enrolled in by reviewing what’s listed under “Repayment Plan.”
Select “View My Loans” to see a breakdown of each of your student loans and its specific details, including the interest accrued and principal balance. Note: You also can reach this page by selecting “Loans” under “My Loans” from the menu bar.
Back on your account Dashboard, under the “Next Payment Due” section, you can view your upcoming student loan payments listed by amount and student loan servicer. Selecting the link(s) provided will take you directly to your student loan servicer’s website. There, you can log in, find more information about your student loans, and make a payment.
Grants
To view information about grants that you’ve received, select “My Grants” from the menu bar. Here you’ll see the number of grants you received, as well as the school, award year, grant type, grant amount, and the disbursed amount. You also can review your Federal Pell Grant Lifetime Eligibility Used.
Records and Documents
You can view records and documents related to your student loan(s) or grant(s) on your “My Activity” page. You can reach this page from your Dashboard or by selecting “My Activity” from the menu bar.
The “My Activity” page lists your completed and in-process documents, including your MPN, your loan counseling completion documents, and your Annual Student Loan Acknowledgement (if you signed one). You can download any of these documents.
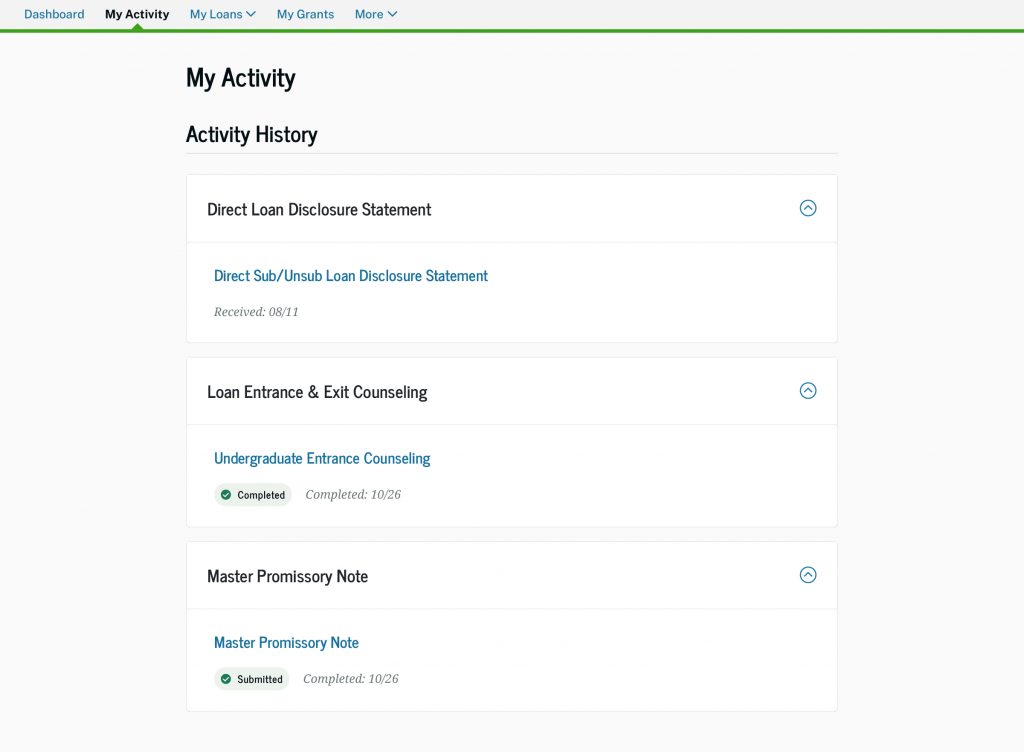
Your “My Activity” page also includes application statuses for your account, including Direct Loan Consolidation, Public Service Loan Forgiveness (PSLF), and income-driven repayment (IDR) plans. If you’re working toward PSLF, your StudentAid.gov account is a helpful tool to manage your application and track your progress toward forgiveness. Read our “How To Manage Your Public Service Loan Forgiveness (PSLF) Progress on StudentAid.gov” article for more information on tracking your PSLF progress.
If you have any outstanding actions that you need to complete, you’ll see an “Action Required” alert next to the item. For example, if you submitted a PSLF form that is missing required information, such as an employer signature, you will see an alert. Or, if you submitted an application for an IDR plan, you may see an “Action Required” alert if you’re required to manually provide a signature because your servicer doesn’t support electronic signatures.
Notifications and Enrollment
Your Dashboard includes other helpful information about your account, such as your notifications and your current and past enrollment history.
You can see your notifications by selecting “My Notifications” under the “More” option in the menu bar. This page will list notifications and correspondence related to your account. You also can view your notifications by selecting the bell icon next to your name.
If you want to review your past enrollment history, you can select “My Enrollment” under the “More” option in the menu bar. This page shows your current campus and program enrollment (if you’re still attending school), your past enrollments, and any pending enrollment change requests. This information is used to determine when your loans enter repayment and whether you are eligible for an in-school deferment.
7
How do I troubleshoot StudentAid.gov account issues?
Whether you’re experiencing log-in issues or problems with your StudentAid.gov account information, select the link below that best matches your question for more information and solutions.
Quick Links for StudentAid.gov Account Troubleshooting
- How do I retrieve my username?
- How do I reset my password?
- Can I get help accessing my StudentAid.gov account?
- How do I unlock my StudentAid.gov account?
- How can I recover my StudentAid.gov account?
- How do I update my StudentAid.gov account log-in information?
- What if I can’t create a StudentAid.gov account because my SSN is already in use?
- What does the error message “Multiple Students Found” mean?
- What if I didn’t receive my secure code?
- How do I set up an authenticator app for my two-step verification?
- How do I verify my identity if I create an account and don’t have an SSN?


